

Key Takeaways
- Armored gear sizing is not the same as regular clothing sizing. The garment must fit correctly in a riding position, not only when standing, and the CE armor must sit over the correct joint zones in that riding position.
- Your standard clothing size is a starting point, not a guarantee. Always match your actual measurements to the brand's specific sizing chart. Sizing varies between brands and between product lines within the same brand.
- The riding position test is the most important fit check. Try the armored gear in a forward-lean seated position and verify that the back hem stays at the waistband, sleeves reach the wrist, and the garment does not pull across the shoulders.
- Armor placement verification is a separate check from garment fit. Once the shirt fits correctly, confirm that the CE armor inserts sit directly over the shoulder and elbow joints in riding posture, not shifted up, down, or to the side.
- If you plan to layer under the armored gear, size to accommodate that layer. A shirt sized for a bare torso will feel tight and restrict armor placement when worn over a thermal or base layer.
- Extended sizes including big and tall options change the armor pocket positioning relative to standard sizes. Verify armor placement specifically in extended size garments rather than assuming it matches standard size placement.
How to choose the right size for armored motorcycle gear requires two separate evaluations that most buyers skip. The first is garment fit: does the shirt or flannel fit the body correctly in a riding position. The second is armor placement: do the CE armor inserts sit correctly over the joints they are meant to protect.
Getting one right without the other means the gear does not perform as intended. A well-fitting shirt with mispositioned armor provides less protection than a correctly fitted shirt with correctly placed armor. This guide walks through both evaluations step by step.
Why Armored Gear Sizing Is Different from Regular Clothing
A standard flannel shirt is sized for comfort when standing and moving through everyday activities. An armored riding shirt must do something additional: it must position CE armor inserts correctly over the shoulder and elbow joints when the wearer is seated in a forward-lean riding posture.
These two requirements create a tension that standard clothing sizing does not address. A shirt that fits well when standing may:
- Allow the back hem to ride up when leaning forward, reducing lower back coverage and potentially shifting lower armor pockets out of position.
- Pull across the shoulders in a forward-lean position, which shifts the shoulder armor pockets forward or upward from the correct position over the shoulder joint.
- Feel shorter in the sleeve when arms are extended in a riding position, which can leave the elbow armor pockets positioned above the elbow joint rather than over it.
The correct size for armored riding gear is the size that fits correctly in the riding position and keeps armor correctly placed in that position. This may or may not match your standard clothing size.
Step 1: Take Your True Measurements
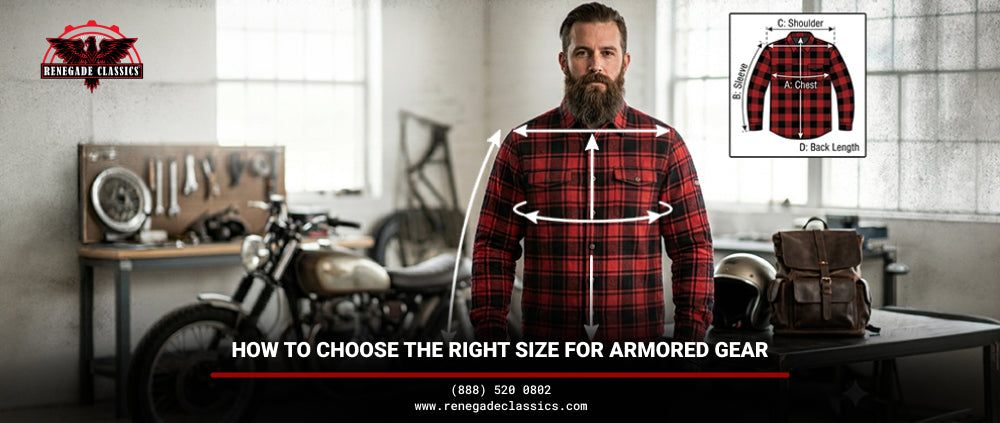
Accurate measurements are the foundation of armored gear sizing. Use a soft measuring tape over thin clothing or a base layer, not over thick outer garments.
Chest
Wrap the tape around the broadest part of the chest, keeping it level and parallel to the floor. Take the measurement while breathing normally, not while holding a deep breath. Note the measurement in inches or centimetres depending on the brand's sizing chart format.
Shoulder Width
Measure from the outer edge of one shoulder to the outer edge of the other across the back. This measurement is particularly important for armored shirts because the shoulder armor pocket position is determined by where the shirt's shoulder seam sits relative to your actual shoulder joint. A shirt with a shoulder seam that falls off your actual shoulder joint will position the shoulder armor pocket in the wrong location.
Sleeve Length
Measure from the top of the shoulder to the wrist bone with the arm extended. In a riding position with arms forward, the sleeve must still reach the wrist. If a sleeve reaches the wrist when standing but pulls above it when arms are extended forward, elbow armor placement will be compromised.
Torso Length
Measure from the base of the back of the neck to the waist. This measurement determines whether the back hem of an armored riding shirt will stay at the waistband in a forward-lean riding position or ride up to expose the lower back.
Step 2: Match Measurements to the Brand Sizing Chart
Once you have your measurements, match them to the specific brand's sizing chart for the specific product you are buying. Do not assume that your size in one brand translates to the same size in another. Sizing varies:
- Between brands: A medium in one riding shirt brand may correspond to a large in another.
- Between product lines within the same brand: A summer-weight flannel and a winter-weight flannel from the same brand may use different sizing patterns.
- Between standard and extended sizes: Big and tall sizing does not simply add length to a standard pattern. The armor pocket positions in tall sizing may be specifically adjusted for longer torso proportions.
When a measurement falls between sizes on the chart, consider which direction to size based on the fit priority. For armored gear, err toward the size that keeps the shoulder seam over your actual shoulder joint, since shoulder armor placement depends on this seam position.
Step 3: Check the Fit in a Riding Position
Try the armored shirt on before verifying armor placement. The garment fit must be correct before armor placement can be accurate.
The Posture Test
Simulate a riding posture: sit on a chair or motorcycle with a slight forward lean and arms extended forward as if holding handlebars. In this position check:
- The back hem stays at the waistband. If it rides up significantly, the shirt may be too short in the torso or the wrong cut for riding posture.
- The sleeves reach the wrist bones. If sleeves pull above the wrist in the riding position, they will not correctly position elbow armor over the elbow joint.
- The shirt does not pull tightly across the shoulders. Pulling across the upper back in a forward lean indicates the shirt is too narrow in the shoulder or back.
The Range of Motion Test
Still in a riding-similar position, check:
- Full forward arm extension without the shirt pulling at the back.
- Ability to turn the head fully to each side without collar restriction.
- Natural breathing without the chest feeling compressed.
A shirt that restricts any of these movements in a riding position will be uncomfortable on longer rides and may cause the rider to shift position in ways that move armor out of its intended location.
The Back Hem Test
Lean forward fully from a seated position. The back hem should remain at the waistband or extend slightly below it. If the hem rises significantly above the waistband in a full forward lean, the back panel is too short for the riding posture. This is particularly important for riders with longer torsos, where standard shirt back lengths often ride up in riding position.
Step 4: Verify Armor Placement
With the garment fitting correctly in riding posture, the second evaluation is whether the CE armor inserts sit over the correct joint zones. Correct placement means:
Shoulder Armor
The shoulder armor insert should sit directly over the shoulder joint, covering the point of the shoulder and the surrounding area. Signs of incorrect placement:
- The insert sits noticeably forward of the shoulder joint toward the chest.
- The insert sits on the upper arm rather than at the shoulder joint.
- The insert shifts when you move the arm forward into riding position.
Shoulder armor placement is primarily determined by the shirt's shoulder seam position. If the seam sits off the shoulder joint, the armor pocket will also be off. This indicates a size or cut mismatch.
Elbow Armor
The elbow armor insert should sit directly over the elbow joint. Check this in the riding position with the arm bent at the natural handgrip angle. Signs of incorrect placement:
- The insert sits above the elbow on the upper arm when the arm is in riding position.
- The insert sits below the elbow on the forearm.
- The insert shifts along the sleeve when the arm moves between riding position and a relaxed position.
Elbow armor placement is affected by sleeve length. A sleeve that is too short will position the elbow pocket above the elbow joint. A sleeve that is too long will position it below the joint. If elbow armor is consistently off regardless of the size tried, the cut of the shirt may not suit your arm proportions and a different product may be needed.
Back Armor
If the shirt includes a back armor pocket, the insert should sit centered on the spine between the shoulder blades, covering the upper and mid-back. Check that the pocket is not shifted to one side and that the insert sits flat against the back without bunching in the riding posture.
For the specific guidance on why shoulder armor slides and what it means for protection, see the shoulder armor sliding guide.
Step 5: Account for Layering
If you ride in cooler weather and wear a base layer, thermal, or mid-layer under the armored shirt, size the armored shirt to accommodate that layer.
A shirt sized for a bare torso will feel tight over a base layer, restrict range of motion, and push armor inserts out of their correct pocket positions. The snugness that held armor correctly in place without a layer may create enough compression over a base layer to affect insert positioning or cause the pockets to bunch and restrict movement.
How to account for layering:
- Try the armored shirt in the store over the type of base layer you plan to wear underneath. If buying online, size up by one size if you intend to wear a thermal or thick base layer under the armored shirt.
- Re-verify armor placement when wearing the layered combination. A shirt that passes the armor placement test bare may need adjustment when layered.
- Be aware that adding significant bulk underneath an armored shirt can affect how the back hem sits in riding posture. A well-fitting shirt may ride up when a thick layer underneath adds torso bulk.
Buying Armored Gear Online: What to Check
Most armored riding shirts are bought online. Without trying the shirt on before buying, the verification steps described above must happen after delivery. Here is how to approach online sizing:
- Use the brand sizing chart, not the label size. A shirt labelled large may correspond to your chest measurement's medium range on the sizing chart. Always measure and chart, not label and guess.
- Check return and exchange policy before buying. Online armored gear purchases may require an exchange if the size does not allow correct armor placement. Confirm the return process is practical before committing to a purchase.
- Read customer reviews for fit notes. Reviews often include specific comments about whether a shirt runs large or small, whether sleeves are short, and whether armor placement was correct. These are more useful than size chart numbers alone for online buying decisions.
- Contact the brand or retailer with specific questions. A specific question about sleeve length at a given size or torso length in a tall size will usually get a direct answer from an established riding gear retailer. This information is more reliable than general size chart guidance.
Extended Sizing Considerations
Big and tall sizing in armored riding shirts presents specific armor placement challenges that standard sizing guidance does not fully address.
- Big sizing (wider chest and shoulders): A wider shoulder width may require a larger size to get the shoulder seam over the shoulder joint, which also affects sleeve length and torso length. Riders who are wide in the shoulders but standard in torso length may find that the size needed for shoulder seam position is too long in the torso.
- Tall sizing (longer torso and sleeve): Tall sizing adds torso length to keep the back hem in position in riding posture and sleeve length to keep elbow armor over the elbow joint. If a standard-length armored shirt consistently allows the back hem to ride up or positions elbow armor above the elbow in riding position, a tall size from the same brand or a brand that offers extended sizing may resolve both issues.
For the full guide to motorcycle gear sizing for big and tall riders, see the big and tall motorcycle gear guide.
For the CE armor level guide that informs which protection level to verify in your correctly fitted gear, see the CE Level 1 vs Level 2 armor guide.
What to Read Next
- CE Level 1 vs Level 2 armor guide covers the certification levels you should verify on the inserts once the armor placement test confirms correct positioning.
- Shoulder armor sliding guide covers the specific causes of shoulder armor movement in riding gear and what to do about it.
- Big and tall motorcycle gear guide covers the specific sizing challenges and solutions for big and tall riders across shirts, flannels, and layered combinations.
The Bottom Line
Choosing the right size for armored gear requires two evaluations: garment fit in riding position and armor placement verification. Getting the garment size right is the starting point. Confirming that CE armor inserts sit correctly over the shoulder and elbow joints in riding posture is the confirmation that the size is actually right for the protective function.
Measure accurately, match to the brand sizing chart rather than defaulting to your usual size, test fit in a riding position, and verify armor placement before riding. If buying online, factor in the return policy and use customer reviews to supplement the sizing chart.
Browse armored flannel shirts at Renegade Classics with sizing guidance available to help you choose the right size for your build and riding style.
Frequently Asked Questions
Should I size up in an armored motorcycle shirt?
Size to your measurements against the brand's specific sizing chart rather than defaulting to a size up or down. If you plan to wear a base layer or thermal underneath the armored shirt, consider sizing up by one size to accommodate the additional layer without restricting armor placement. If you fall between sizes on the chart, consider which measurement is most critical for armor placement, typically shoulder width, and prioritize that measurement when choosing between adjacent sizes.
How do I know if shoulder armor is correctly placed?
In a riding position, the shoulder armor insert should sit directly over the shoulder joint. Place your hand on your shoulder joint while wearing the shirt and feel whether the armor insert is centered over that point. If the insert sits noticeably in front of the joint, behind it, or on the upper arm rather than at the joint, the placement is off. This may indicate a size issue (shirt shoulder seam not sitting over your shoulder joint) or a cut mismatch for your body proportions.
What happens if armor shifts position during riding?
CE-certified armor that is not positioned over the joint it is designed to protect provides less protection than its certification implies. The certification test assumes the armor is correctly placed. An insert that has shifted to the upper arm rather than the elbow joint does not absorb impact at the elbow joint in a crash. Correct fit and armor placement verification before riding ensures the certification actually applies to the protection you receive.
How do I account for layering when sizing armored gear?
Try the armored shirt over the specific base layer or thermal you plan to wear under it when purchasing in person. When buying online, size up by one size from your bare measurement size if you plan to add a thick layer underneath. After adding any layer, re-run the armor placement check to confirm the inserts are still sitting correctly over the joints. Thick under-layers can compress armor pocket fabric and shift insert positions.
Can I use my regular clothing size for armored gear?
Your regular clothing size is a starting point for finding the right range on a brand's sizing chart but should not be used as a substitute for checking your actual measurements against the brand's specific chart. Armored gear brands use their own sizing patterns that often differ from mainstream clothing. A medium in a riding shirt brand may fit differently from a medium in a retail clothing brand. Always measure and chart rather than assuming your usual size will apply.


